HTMLScribe SaaS Documentation
Introduction
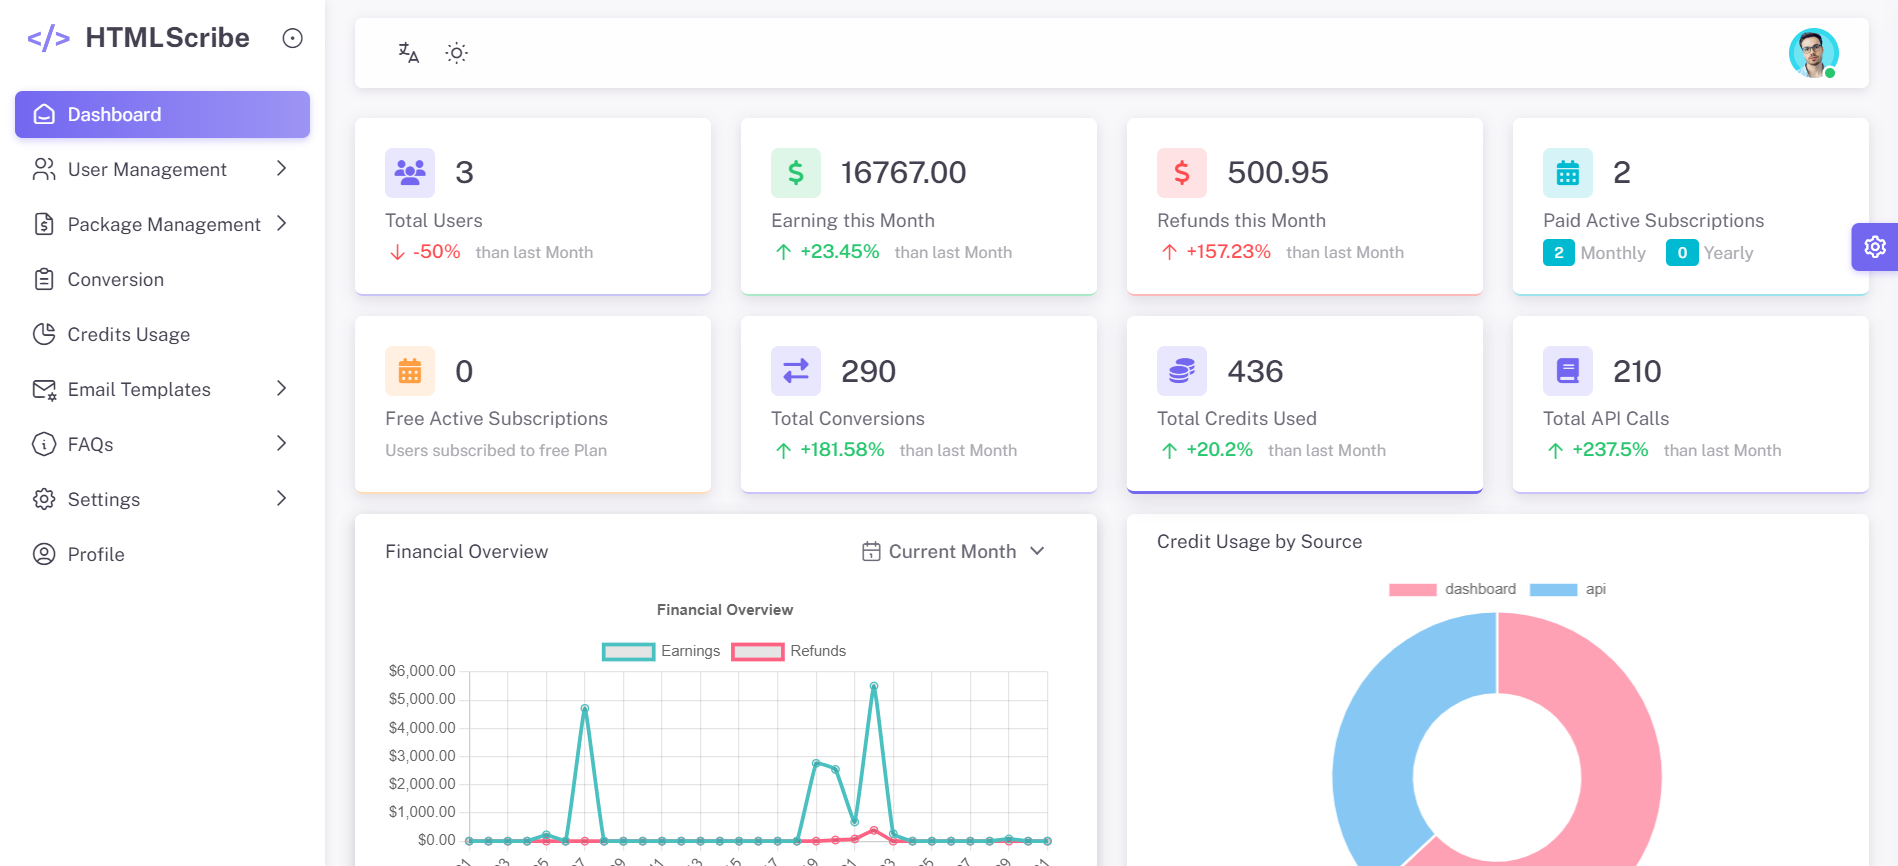
Welcome to the documentation for HTMLScribe SaaS. This guide will help you set up and use our application, which is built with Laravel 11 and uses Vite for asset compilation. The system also includes a Node.js application used for generating PDFs and images.
System Requirements
For Laravel Application:
- PHP >= 8.2.12 or above
- Laravel 11.0.0 or above
- Composer 2.3.7 or above
- Node.js (v18.X) or above
- MySQL 5.7+ or above
PHP Extensions:
- BCMath
- Ctype
- JSON
- Mbstring
- OpenSSL
- PDO
- Tokenizer
- XML
- Fileinfo
- Sodium Extension
- GD
- Zip
In most servers, these extensions are enabled by default, but you should check with your hosting provider.
Services:
- Database: MySQL
- Cache: Database
- Queue: Database
- Session: Database
- Mail: SMTP
For Node.js Application:
- Node.js (v18.X or above)
- npm or yarn
- libxfixes3, libxkbcommon0, libnss3, libatk1.0-0, libatk-bridge2.0-0, libcups2, libxcomposite1, libxrandr2, libxdamage1, libgbm1, libasound2, libpango1.0-0, libcairo2
Database Configuration
Before starting the admin installation, you must configure the database for the application.
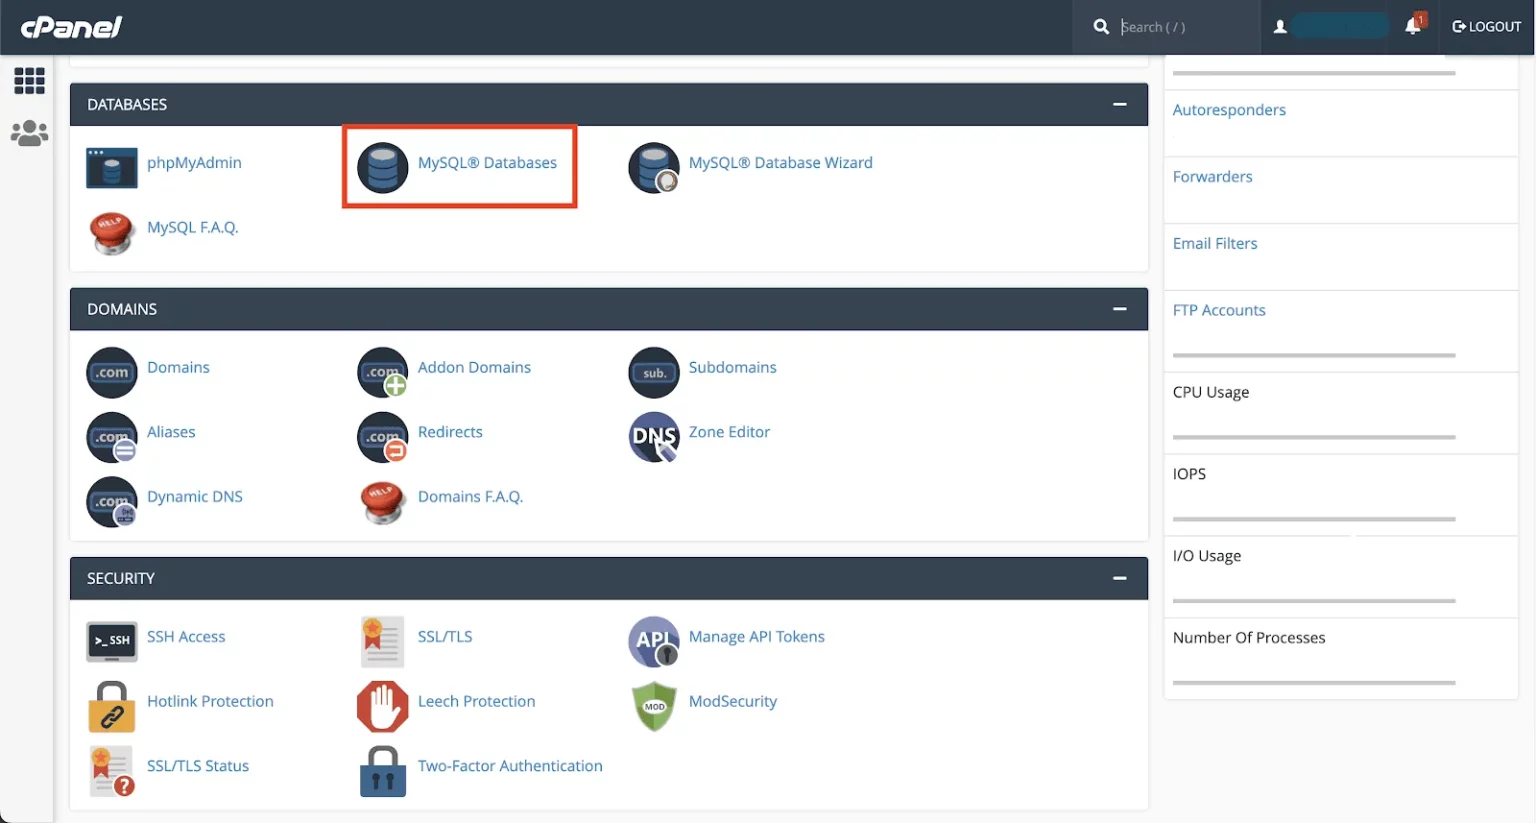
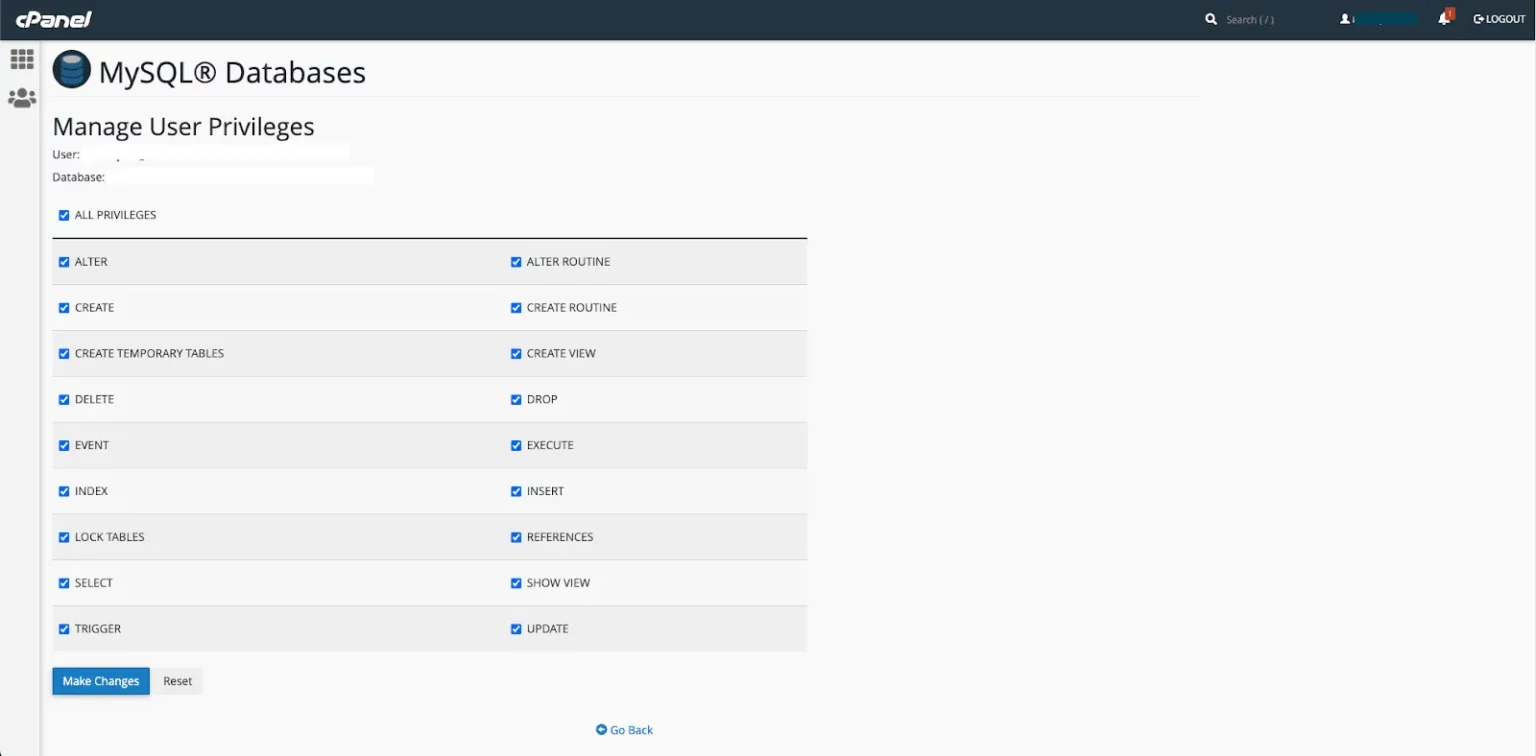
Steps to Create and Configure the Database
-
Go to MySQL Databases
-
Create a New Database

-
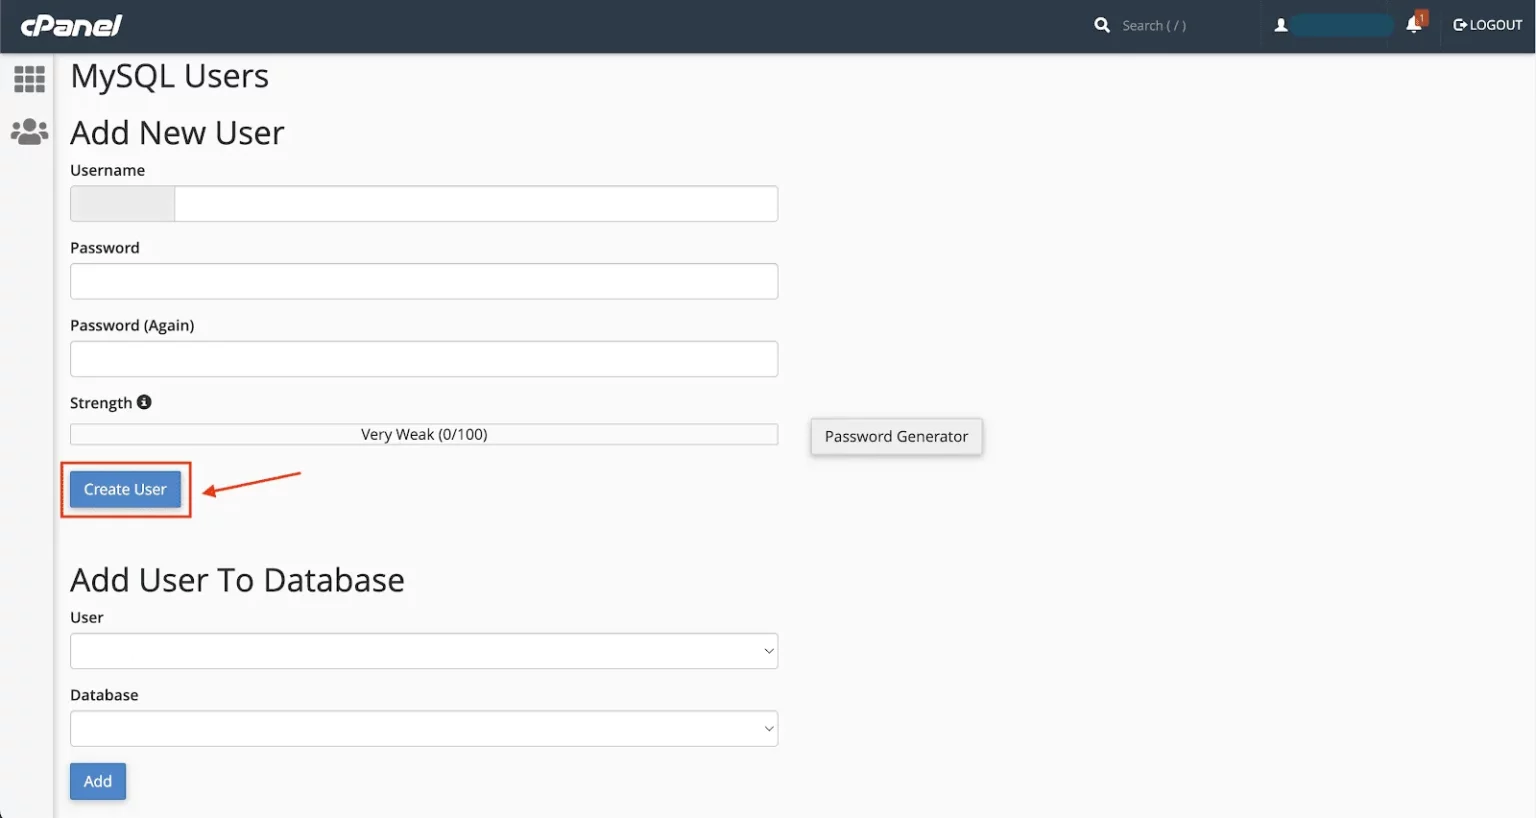
Create a Database User
-
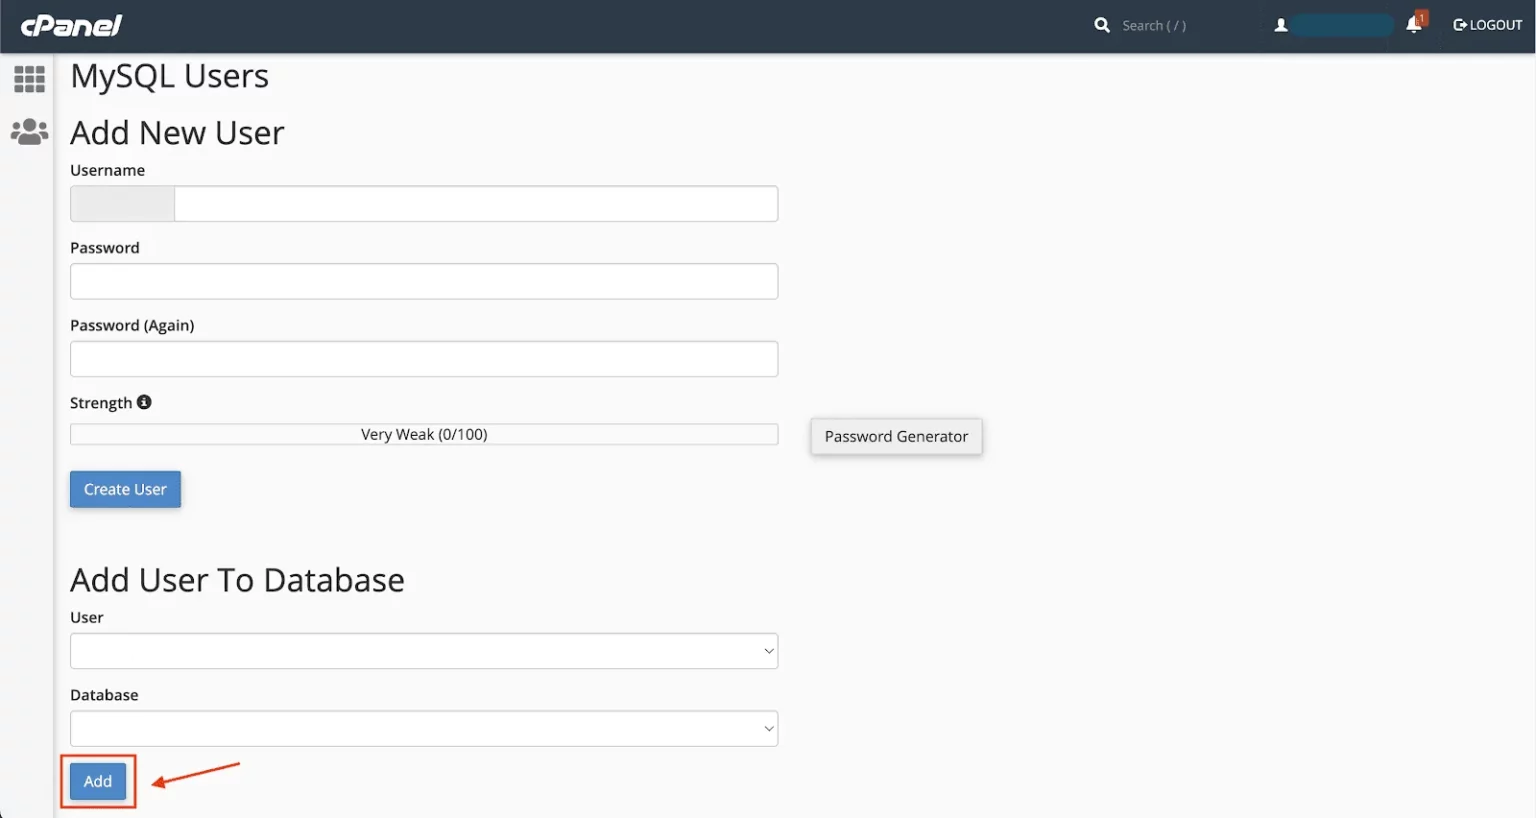
Add the User to the Database
-
Assign User Privileges
Local Setup
Setting up the Laravel Application
- Extract the ZIP file containing the project to your desired location
- Navigate to the project directory and open the terminal
- Install PHP dependencies:
composer install - Generate an application key:
php artisan key:generate - Create a local database and configure it in the .env file:
DB_CONNECTION = mysql DB_HOST = localhost DB_PORT = 3306 DB_DATABASE = DATABASE_NAME DB_USERNAME = root DB_PASSWORD = - Import the database
htmlscribedb.sqlfile to the created database - Update the application URL in .env:
APP_URL=your_domain_url - Update the Node API URL in .env:
NODE_API_URL=your_sub_domain_url - Install Node.js dependencies:
npm install - Compile assets:
npm run dev - Start the development server:
php artisan serve - Storage Linking (optional):
If images aren't showing, ensure thepublic/storagefolder exists; if not, run:php artisan storage:link
Local Setup for Node.js API Server
- Upload
HtmlScribefunctions.zipto your chosen directory and extract it. - Update
BASE_URLandLARAVEL_API_URLin .env:BASE_URL=your_local_url_of_nodejs_api_serverLARAVEL_API_URL=your_local_url_of_admin_dashboard - Install Node.js dependencies and start the server:
npm installnode app.js
Server Setup
After downloading the code from Codester or any Marketplace, upload the HtmlScribe.zip file to your server directory and extract it.
HTMLScribe can be installed on your main domain or subdomain, e.g, yourdomain.com or subdomain.yourdomain.com.
Server Setup for Laravel Admin Dashboard
Uploading to cPanel:
-
Create a database on your server and add the database credentials to the
.envfile:DB_CONNECTION=mysql DB_HOST=127.0.0.1 DB_PORT=3306 DB_DATABASE=DATABASE_NAME DB_USERNAME=DATABASE_USERNAME DB_PASSWORD=DATABASE_PASSWORD -
Update
APP_URLin.envwith the URL where you uploaded HtmlScribe:APP_URL=your_domain_url -
Update
NODE_API_URLin.envwith the URL for HtmlScribeFunctions:NODE_API_URL=your_sub_domain_url -
Update
APP_NAME,APP_ENV, andAPP_DEBUG:APP_NAME=Your Saas Name APP_ENV=production APP_DEBUG=false -
Open the dashboard directory and install Node.js dependencies:
npm install
                npm run build
No need to copy the
node_modulesfolder to the server. - Log in to your cPanel account and navigate to the File Manager.
- Upload the dashboard to your desired directory.
-
Import the database
htmlscribedb.sqlfile to the database you created. -
Install PHP dependencies:
composer install -
Generate the Scribe documentation:
php artisan scribe:generate -
Storage Linking:
php artisan storage:link
You can watch this video for Nodejs. The video installation is using Vps terminal but you will get the basic idea Watch Video
Server Setup for Node.js API Server
-
Upload
HtmlScribefunctions.zipto your desired directory:- Connect to your server using cPanel or Plesk's file manager, or via FTP.
- Navigate to the directory and extract
HtmlScribefunctions.zip.
-
Update
BASE_URLandLARAVEL_API_URLin.env:BASE_URL=your_nodejs_api_url LARAVEL_API_URL=your_admin_dashboard_url -
Install Node.js dependencies via terminal:
npm install -
Install libraries required for screenshot and PDF generation:
sudo apt-get update
                                sudo apt-get install -y libxfixes3 libxkbcommon0 libnss3 libatk1.0-0 libatk-bridge2.0-0 libcups2 libxcomposite1 libxrandr2 libxdamage1 libgbm1 libasound2 libpango1.0-0 libcairo2
Run
node test.jsIf it showsChromium launched successfully.then it is almost set and if you run into some errors, you need to look into it whether its asking for missing library (install it) or some error like
Error: Could not find Chrome (ver. 127.0.6533.72). This can occur if either
                                        you did not perform an installation before running the script (e.g. `npx puppeteer browsers install chrome`) or
                                        your cache path is incorrectly configured (which is: C:\Users\Kamaldeep\.cache\puppeteer).
                                        For (2), check out our guide on configuring puppeteer at https://pptr.dev/guides/configuration.
If the error is like this then you need to runnpx puppeteer browsers install chrome -
Set
app.jsas the server entry point:- In cPanel, go to "Setup Node.js App" and set the correct environment.
- In Plesk, go to "Hosting Settings" and set
app.jsas the startup file.
System Configuration
These configurations are crucial for HTMLScribe to function correctly. Please follow each step carefully.
-
Email Configuration
Navigate to: Left Sidebar -> Settings -> Mail
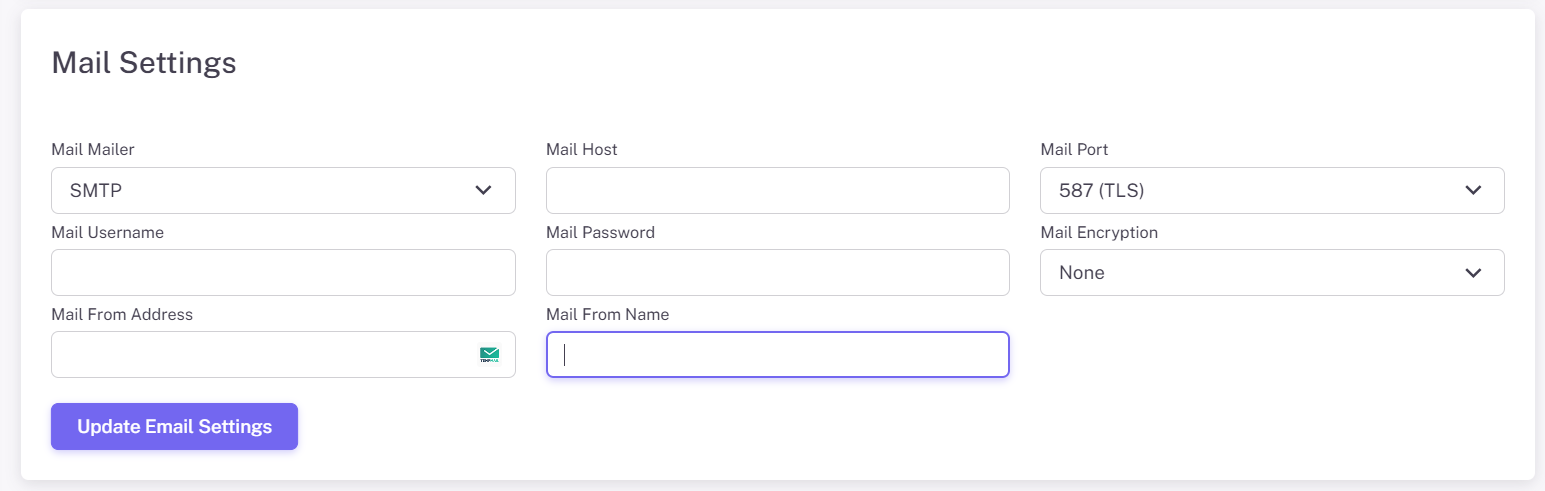
Setting up Email:
- Choose your mail driver/mailer (SMTP recommended for reliability)
- Enter your SMTP server/Mail Host address (e.g., smtp.gmail.com for Gmail)
- Set the SMTP port (usually 587 for TLS or 465 for SSL)
- Enter your email username and password
- Set encryption type (TLS or SSL, depending on your mail server)
- Enter the "From" email address and name for outgoing emails
After configuring, use the "Send Test Email" feature to ensure everything is working correctly.
-
Payment Configuration (Stripe, Paypal, and Paddle)
Navigate to: Left Sidebar -> Settings -> Payment
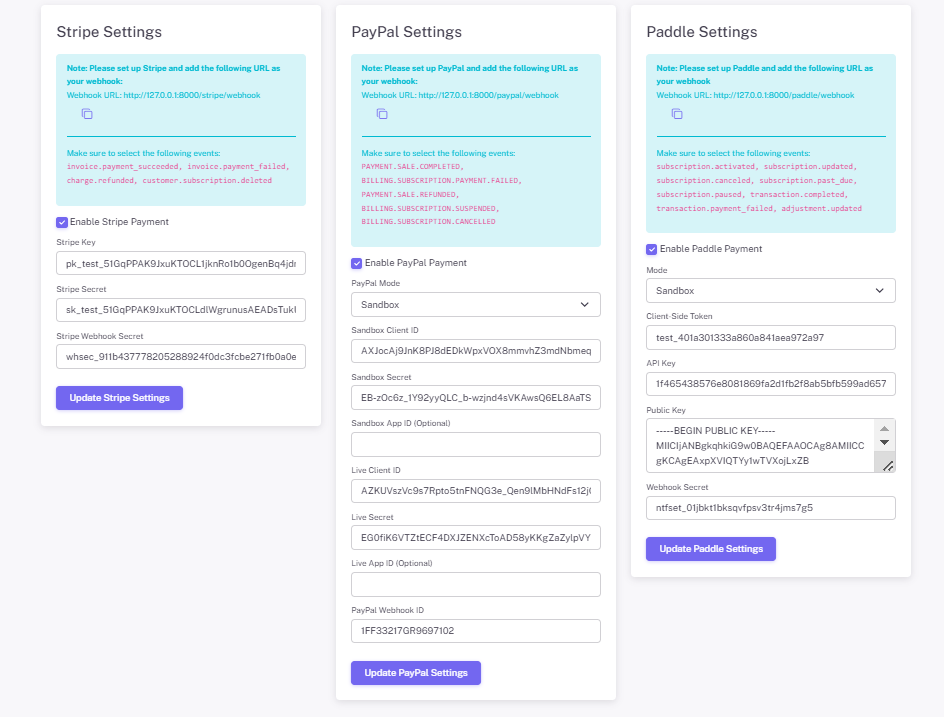
Setting up Stripe, PayPal, & Paddle Subscriptions with Webhooks:
- Enter your Stripe, PayPal, and Paddle API keys in HTMLScribe settings
- Set up Stripe Webhook:
- Go to Stripe Dashboard -> Developers -> Webhooks
- Add endpoint:
https://your-domain.com/stripe/webhook - Select events:
invoice.payment_succeeded, invoice.payment_failed, charge.refunded, customer.subscription.deleted - Copy Webhook Secret to HTMLScribe
- Set up PayPal Webhook:
- Go to PayPal Dashboard -> Developer -> Webhooks
- Add endpoint:
https://your-domain.com/paypal/webhook - Select events:
PAYMENT.SALE.COMPLETED, SUBSCRIPTION.PAYMENT.FAILED, SALE.REFUNDED, SUBSCRIPTION.SUSPENDED, SUBSCRIPTION.CANCELLED - Copy Webhook ID to HTMLScribe
- Set up Paddle Webhook:
- Go to your Paddle Dashboard -> Developer Tools-> Notification
- Add endpoint:
https://your-domain.com/paddle/webhook - Select events:
subscription.activated, subscription.updated, subscription.canceled, subscription.past_due, subscription.paused, transaction.completed, transaction.payment_failed, adjustment.updated - Copy the Webhook ID to HTMLScribe
Test subscriptions to ensure proper setup.
-
Cron Job and Queue Process Configuration
1. Cron Job Setup
Navigate to: Left Sidebar -> Settings -> CronJob
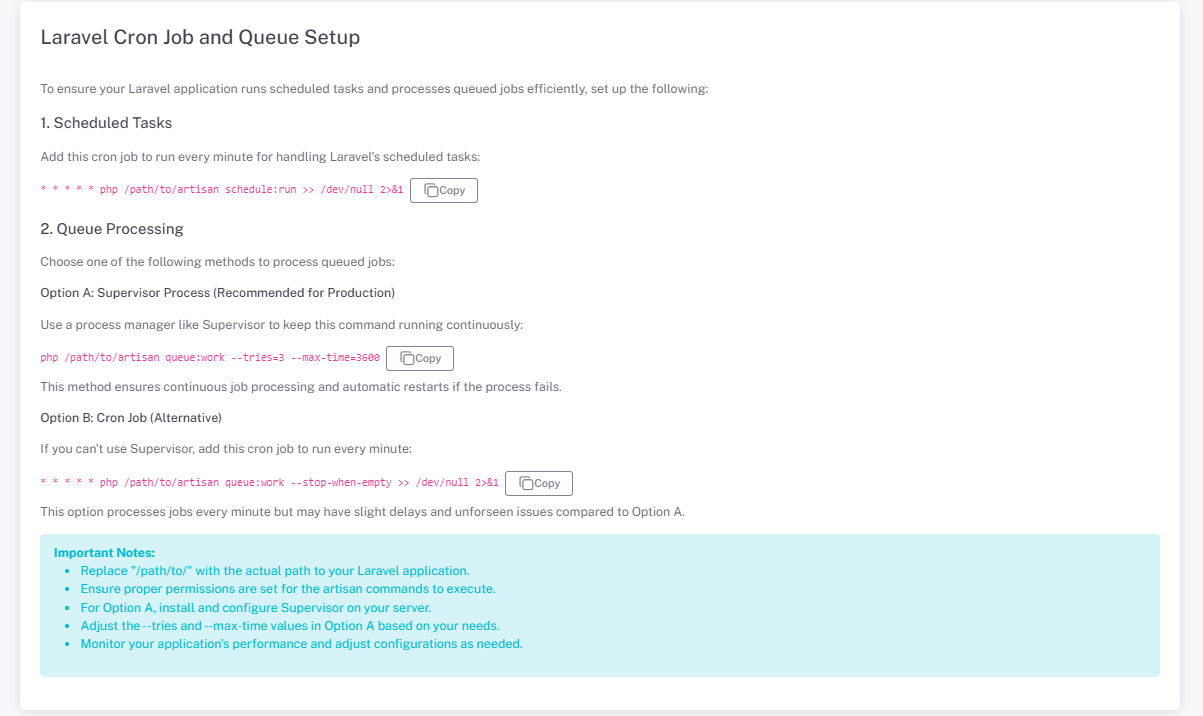
Setting up Cron Job:
- Copy the cron command displayed in the settings
- Access your server's cron job manager (often found in cPanel or through SSH)
- Create a new cron job and paste the copied command
- Set the cron job to run every minute:
* * * * *
The cron job is essential for processing scheduled tasks, such as sending emails, updating subscription statuses, and resetting credits.
2. Queue Process Setup
Setting up Queue Worker:
Choose one of the following methods to process queued jobs:
Option A: Supervisor (Recommended for Production)
- Install Supervisor on your server
- Create a new Supervisor configuration file for your queue worker
- Add the following command to your Supervisor config:
php /path/to/your/project/artisan queue:work --tries=3 --max-time=3600Adjust the path, tries, and max-time as needed for your application.
Option B: Manual Long-Running Process
If you can't use Supervisor, you can run the queue worker as a long-running process:
nohup php /path/to/your/project/artisan queue:work > /dev/null 2>&1 &Note: This method requires manually restarting the process if it stops.
The queue worker processes background jobs such as sending emails, generating reports, and other time-consuming tasks to improve application responsiveness.
Zapier Configuration
First you need to visit Zapier Developer. Create a developer account if you don't have an account.
-
Create a new app
After adding the required details, click the "Create" button to create the app.
Info: At Start you can select Private for Intented Audience and later change it to Public when everything is working fine.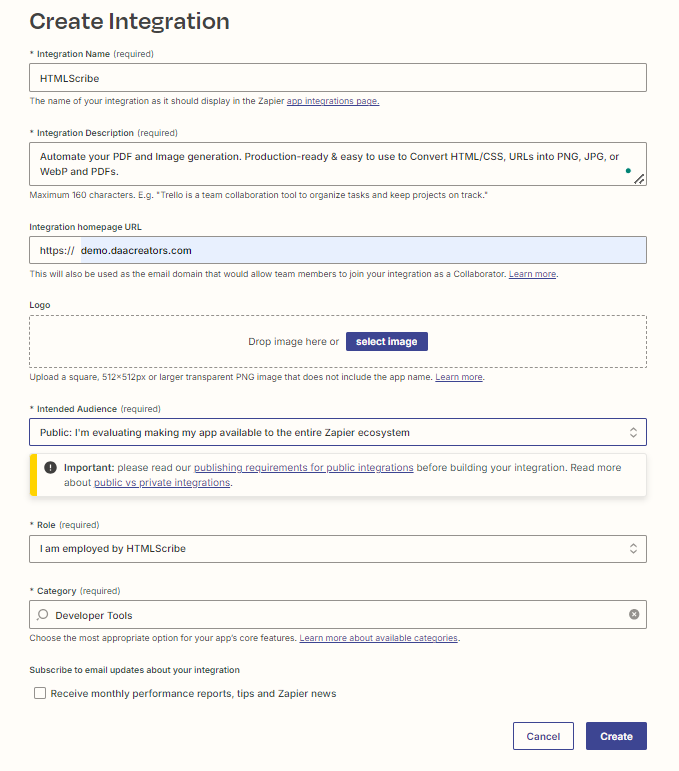
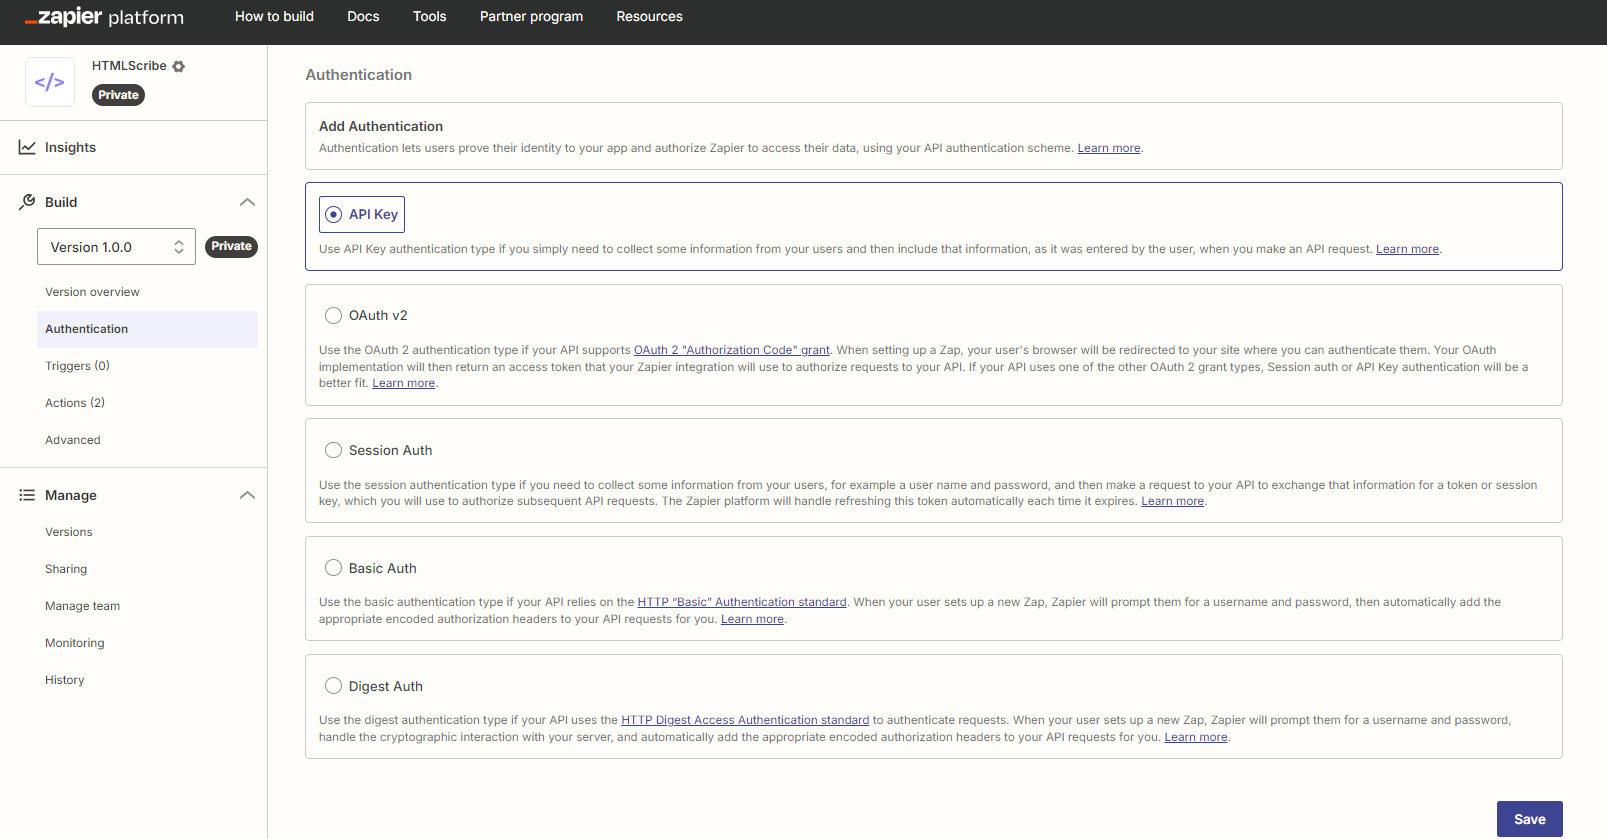
-
Authentication for APP
After creating the app, next step is to setup Authentication for it. Select API KEY and click save
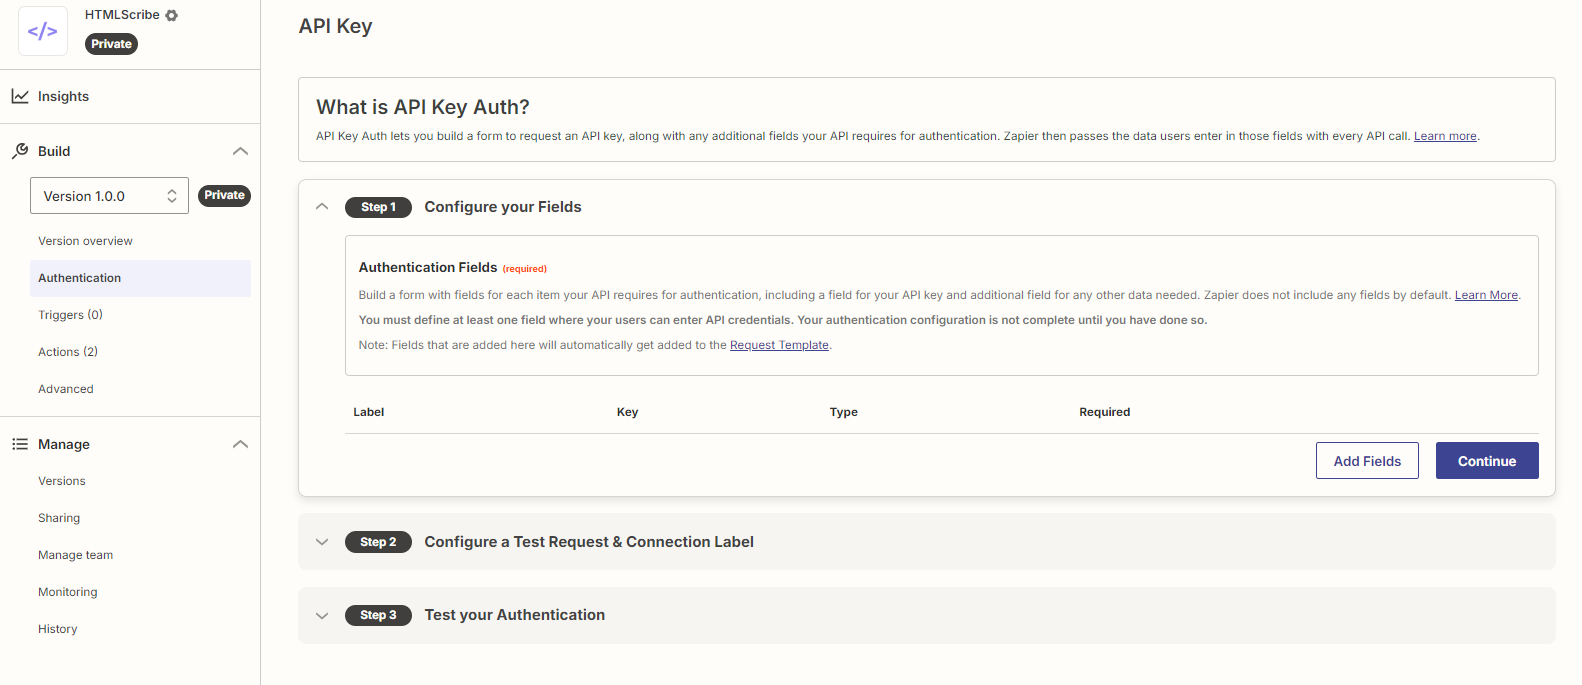
-
Add Field for Authentication
Click on the Add Fields
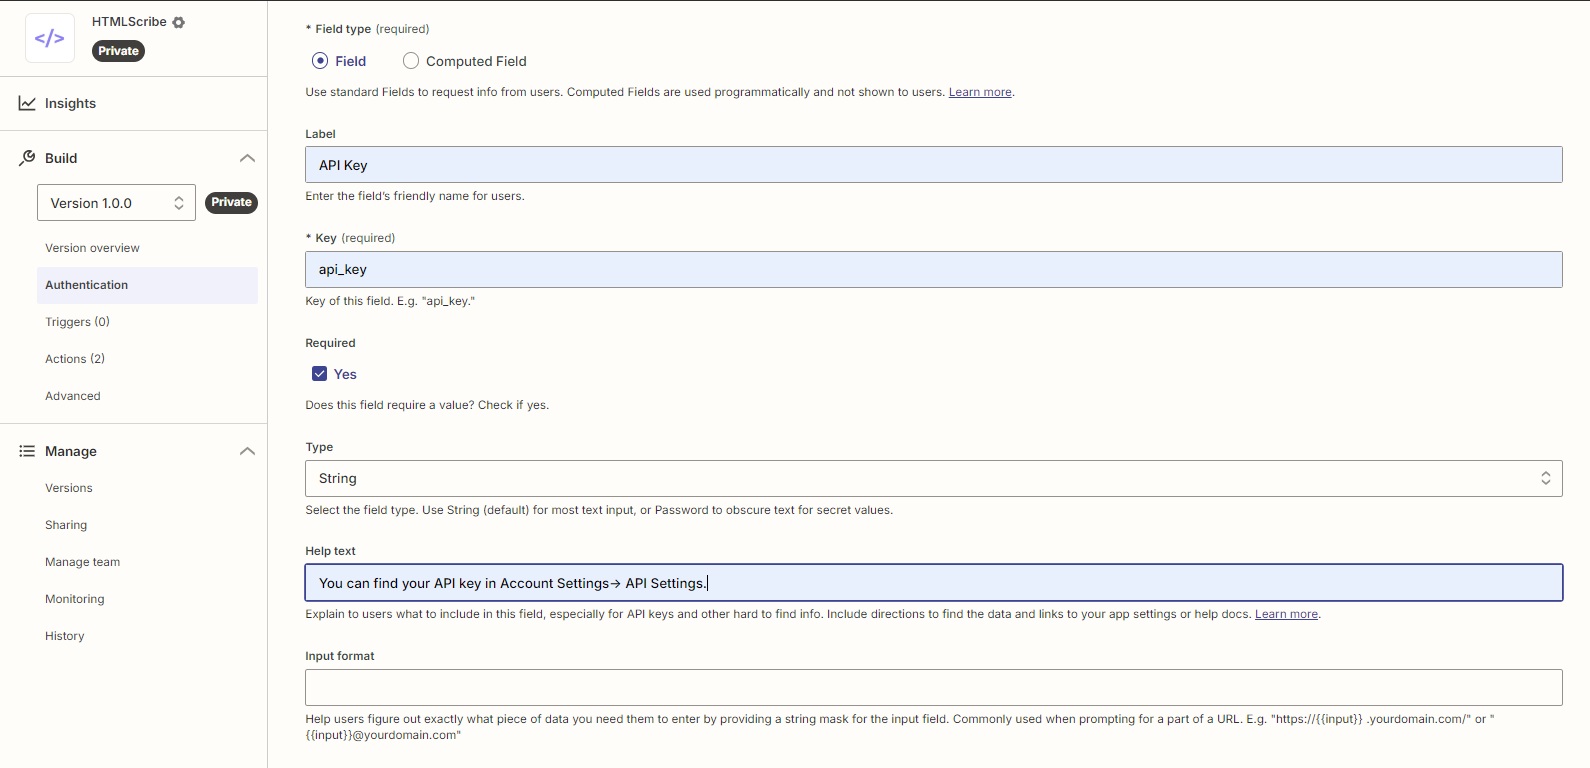
-
Add Details to the Field for Authentication
After adding the details click on Add
-
Go to Advanced
On the Left side click on
Advancedand chooseRequest Templatein tab and thenHTTP Headers. Update thefieldif it exist to match to one in below image. If it does not exists make sure you have done the above steps correctly.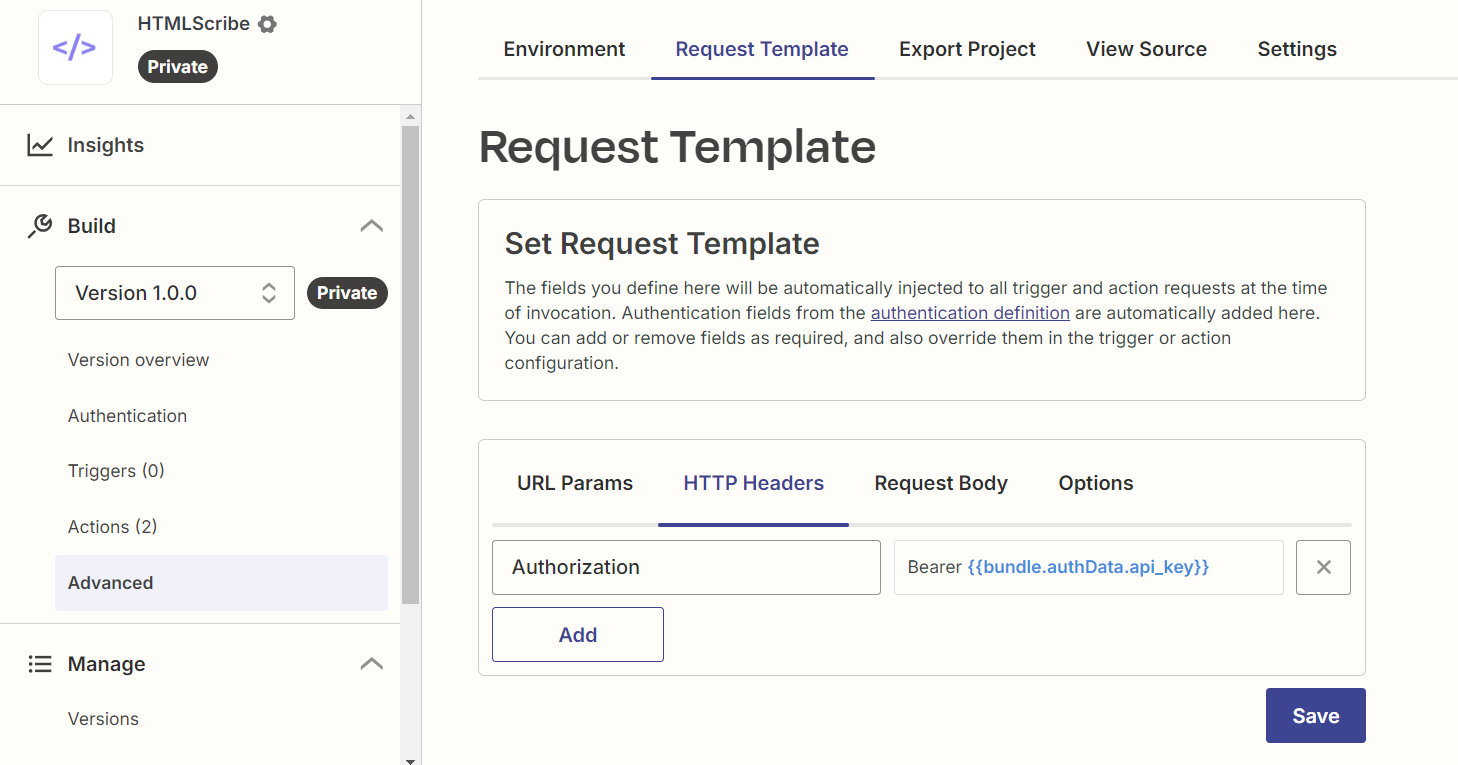
-
Go back to Authentication
Edit it and go to Step 2. Add url like
https://yourdomain.com/api/zapier/auth-testas aGETrequest, theyourdomain.comis the domain where you have uploaded dashboard. ClickSave & Continue.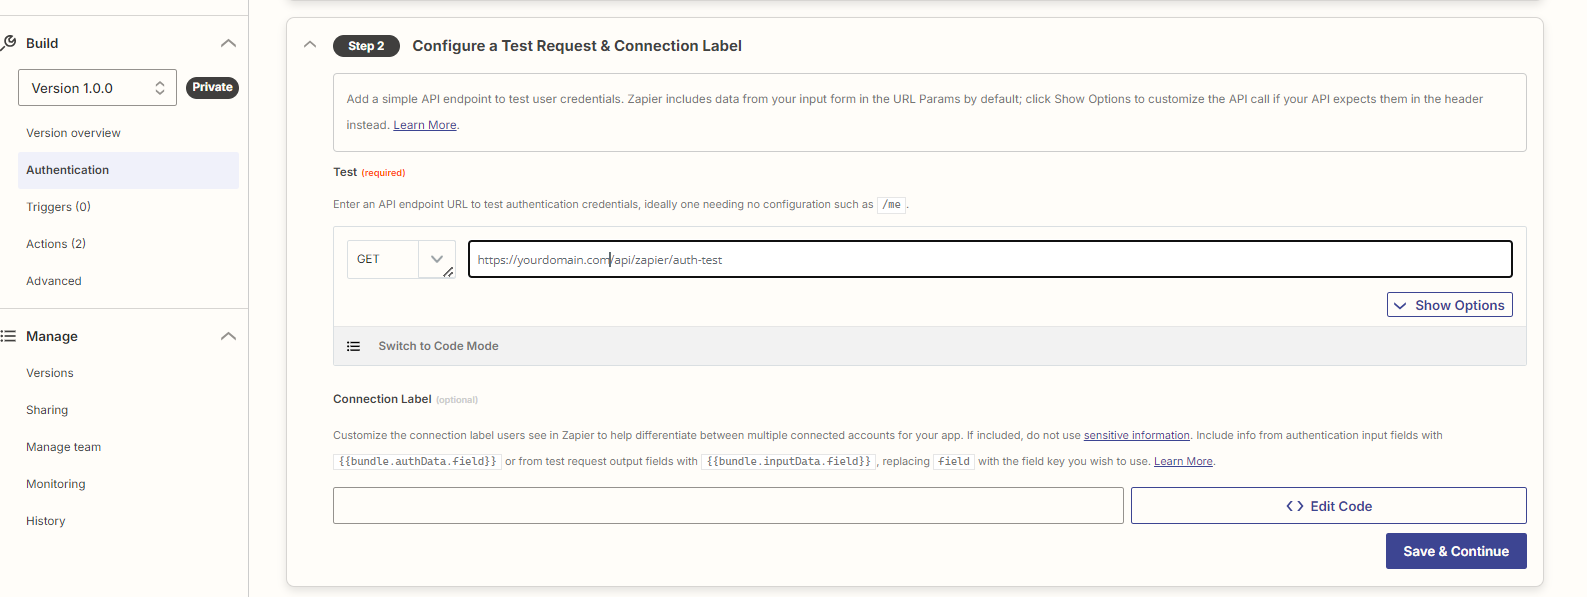
-
Step 3 in Authentication - a
Go to Step 3. Click on account where it will show a popup where you will need to add an api key. You can create a demo user and create api for that user. Then click
Test Authentication.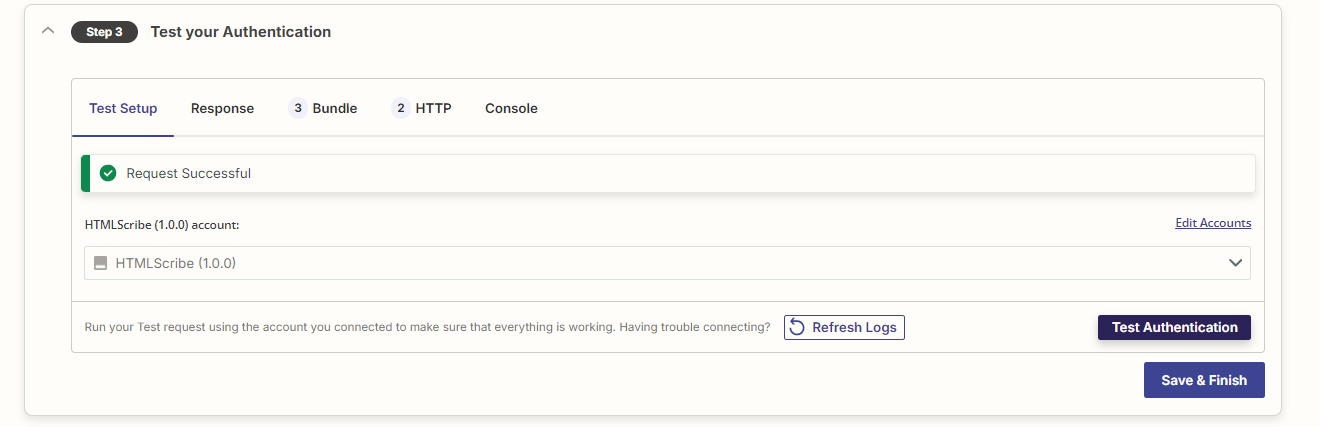
-
Step 3 in Authentication - b
After clicking
Test Authenticationif you get this response. It means things are going correctly. If not then look at the above steps if you have missed something.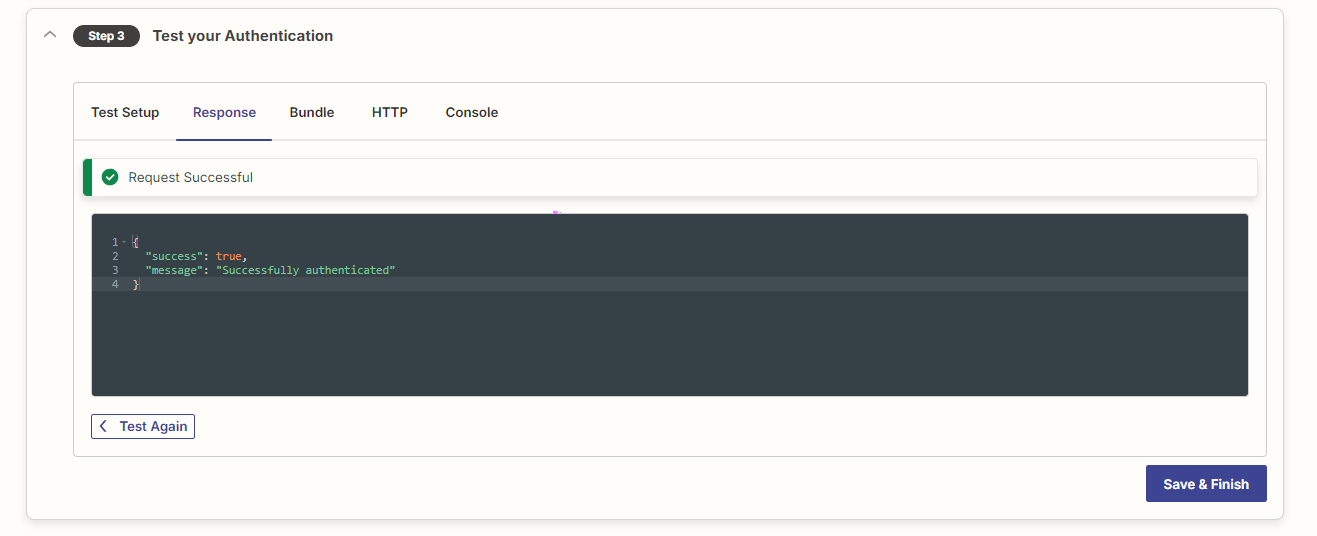
-
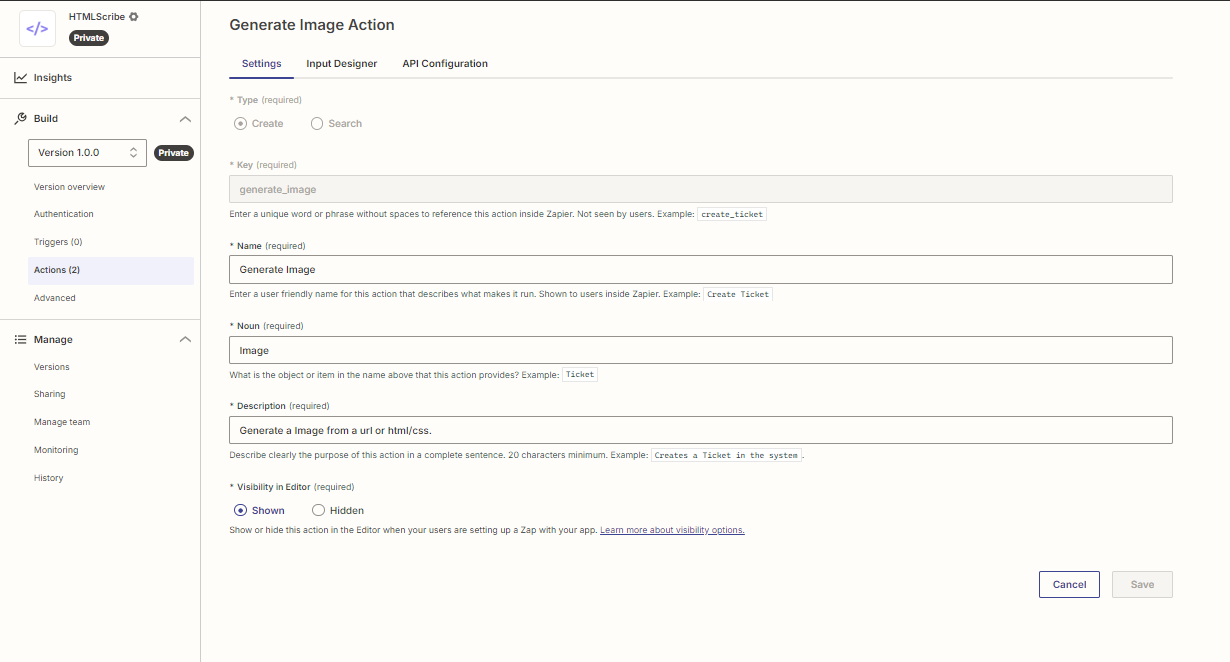
Create Action
Click
Actionson the left side panel and create a new action. Fill the details like in the image and save it. Do it twice. One for PDF and for Image like in the images below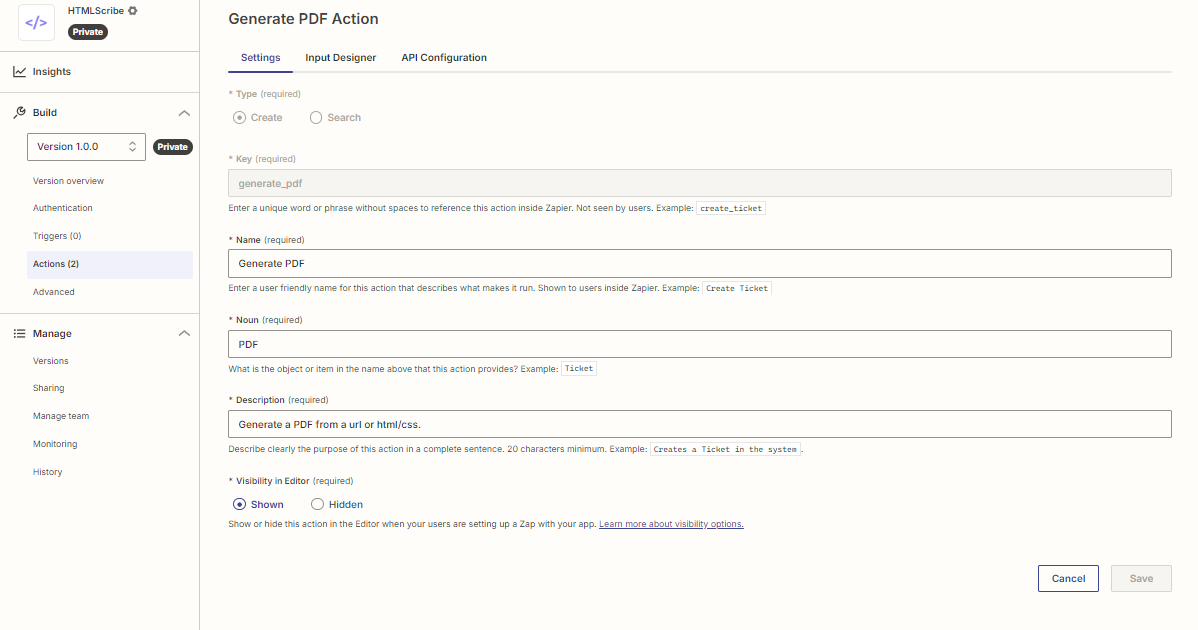
-
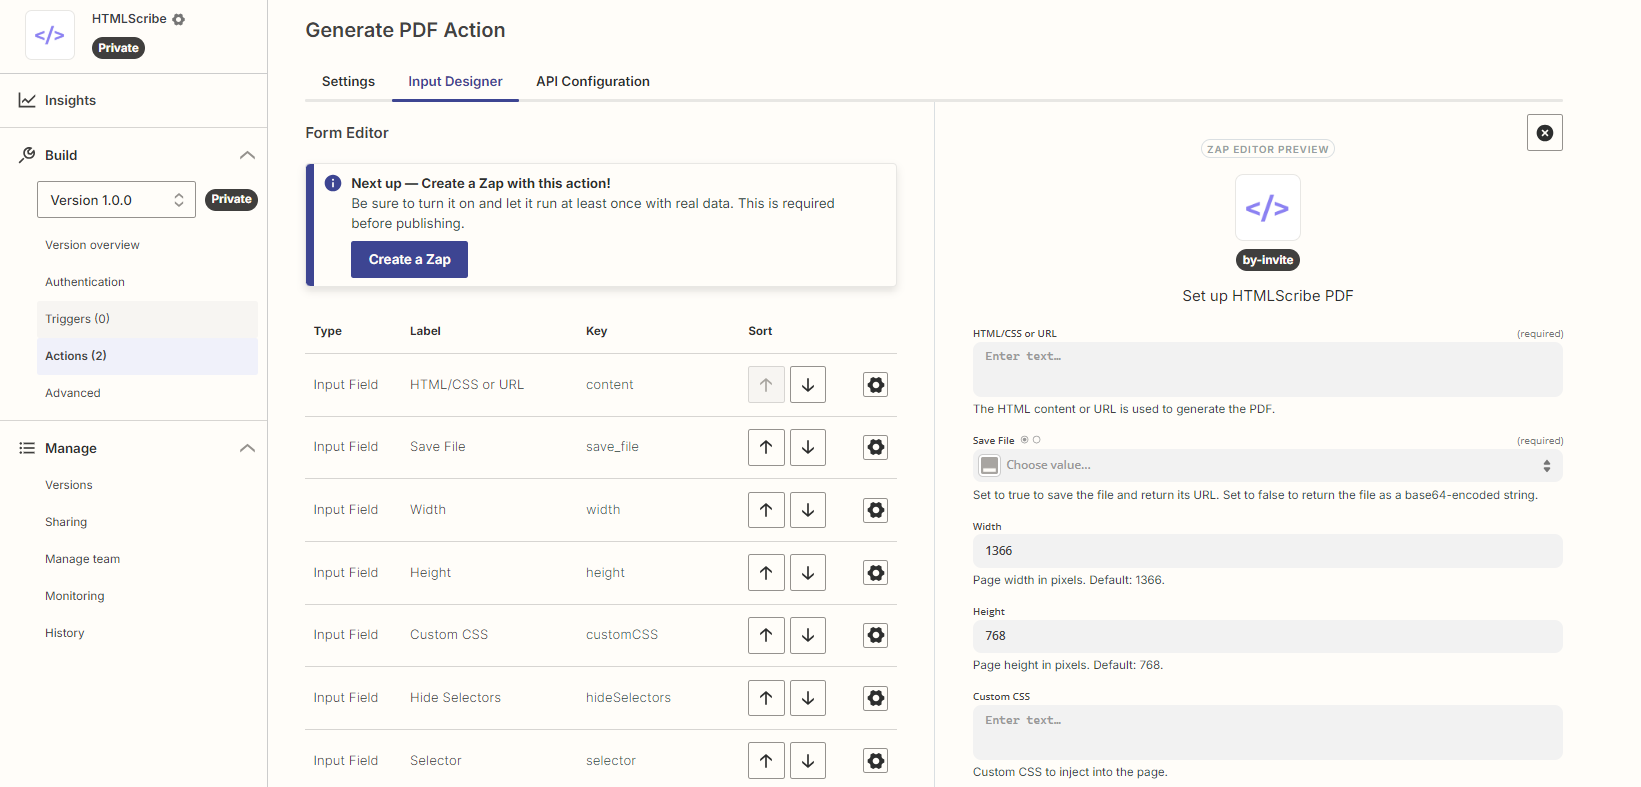
Edit Action
Edit
Actionsone by one and inInput Designertab to add all the fields/atrributes. You can find all the fileds for PDF and Image within API Documentation. Some are required fields and some are optional. Make sure to mark the required fields as Required when adding.Important: Make Sure the Keys matches the exact names in the API docs..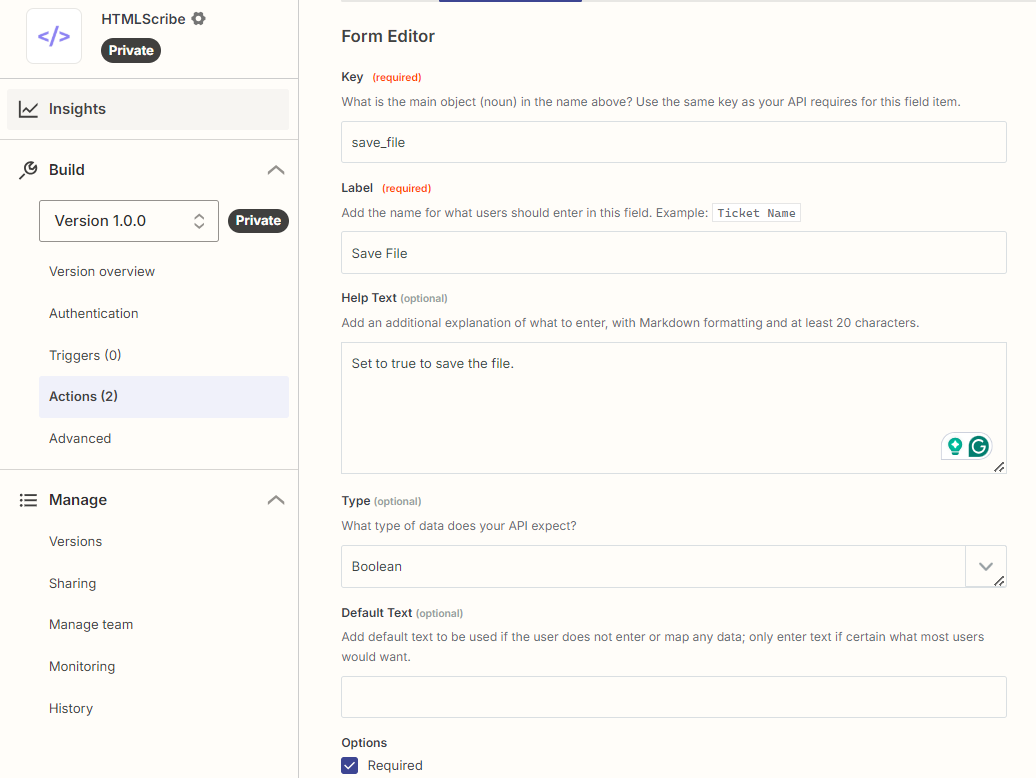
-
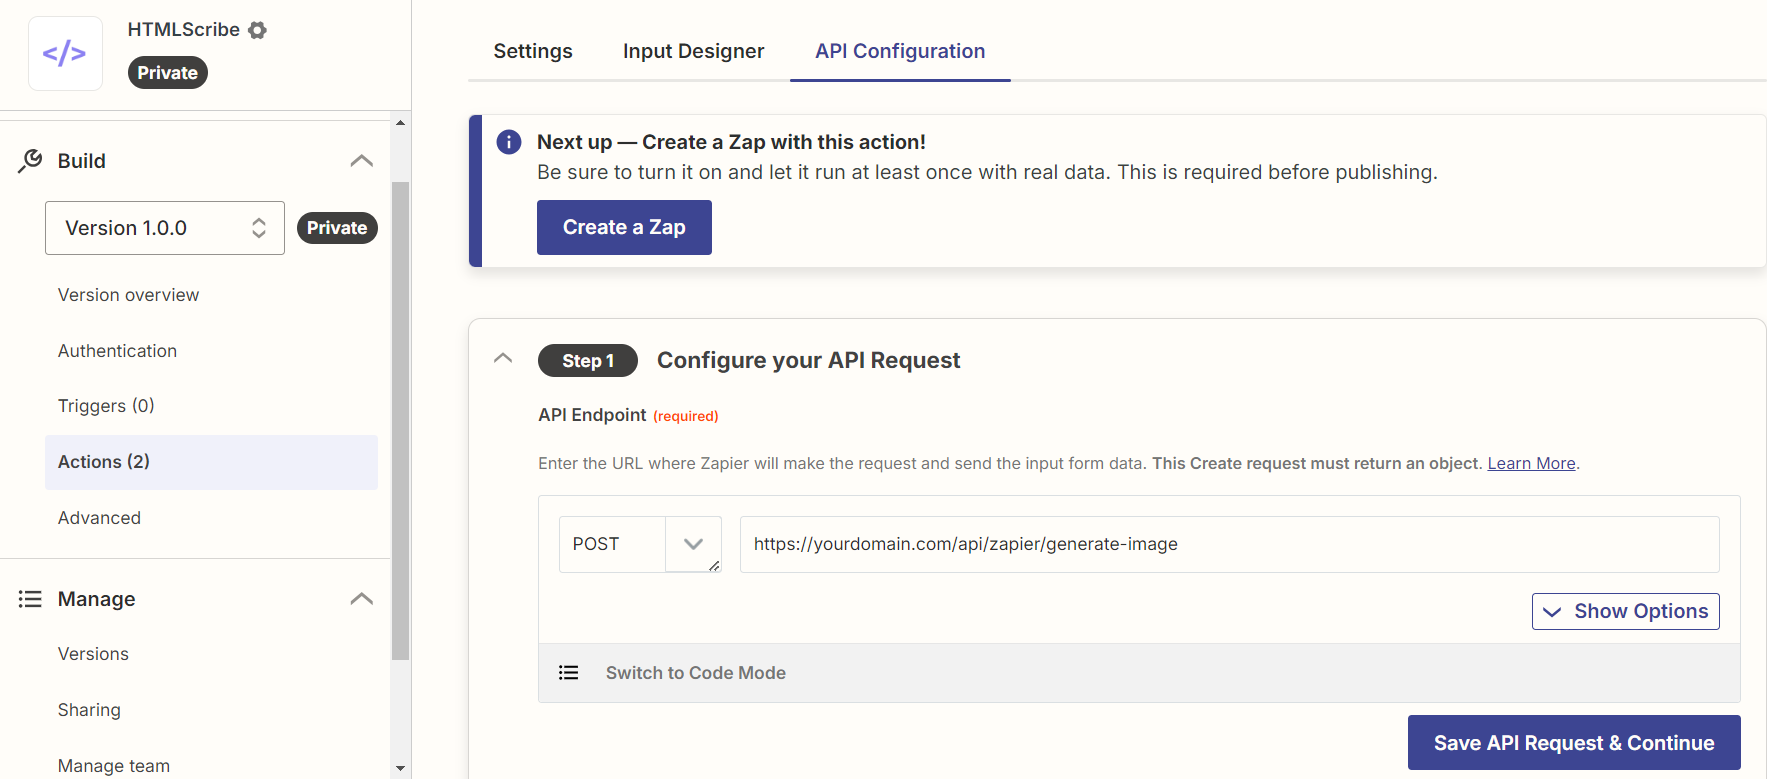
Edit Action
Edit
Actionsone by one and inAPI Configurationtab. Add url likehttps://yourdomain.com/api/zapier/generate-imagefor the Image Action andhttps://yourdomain.com/api/zapier/generate-pdffor PDF action as aPOSTrequest, theyourdomain.comis the domain where you have uploaded dashboard.
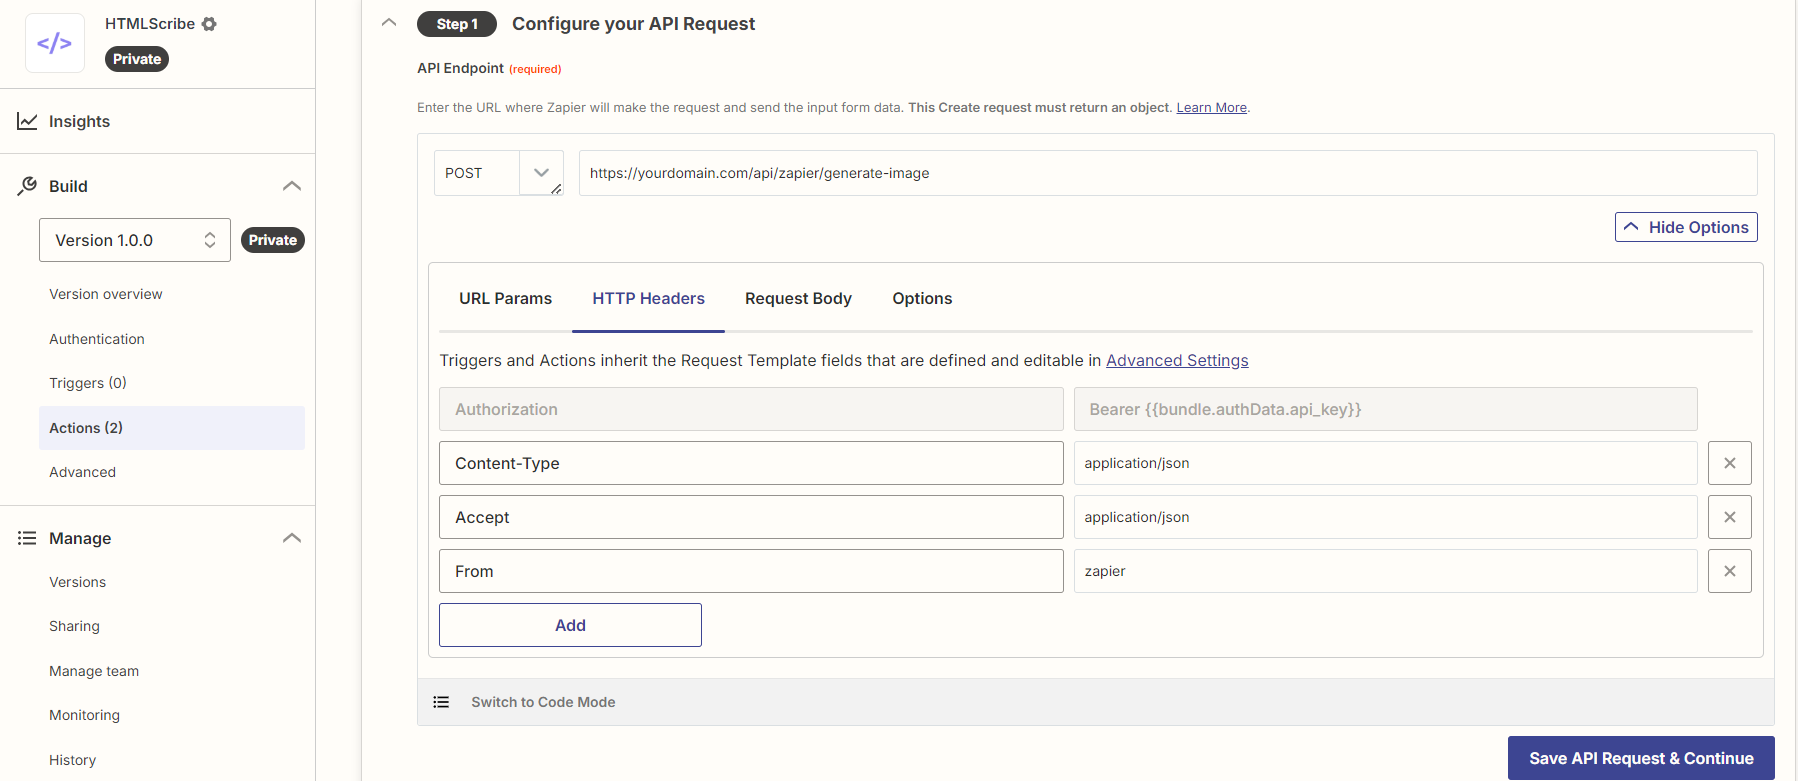
ClickShow Optionsand go toHTTP Headersto add another field with key asFromand value aszapier. Like in the second image. Make sure it matches. It is case sensitive. ClickSave API Request & Continue.
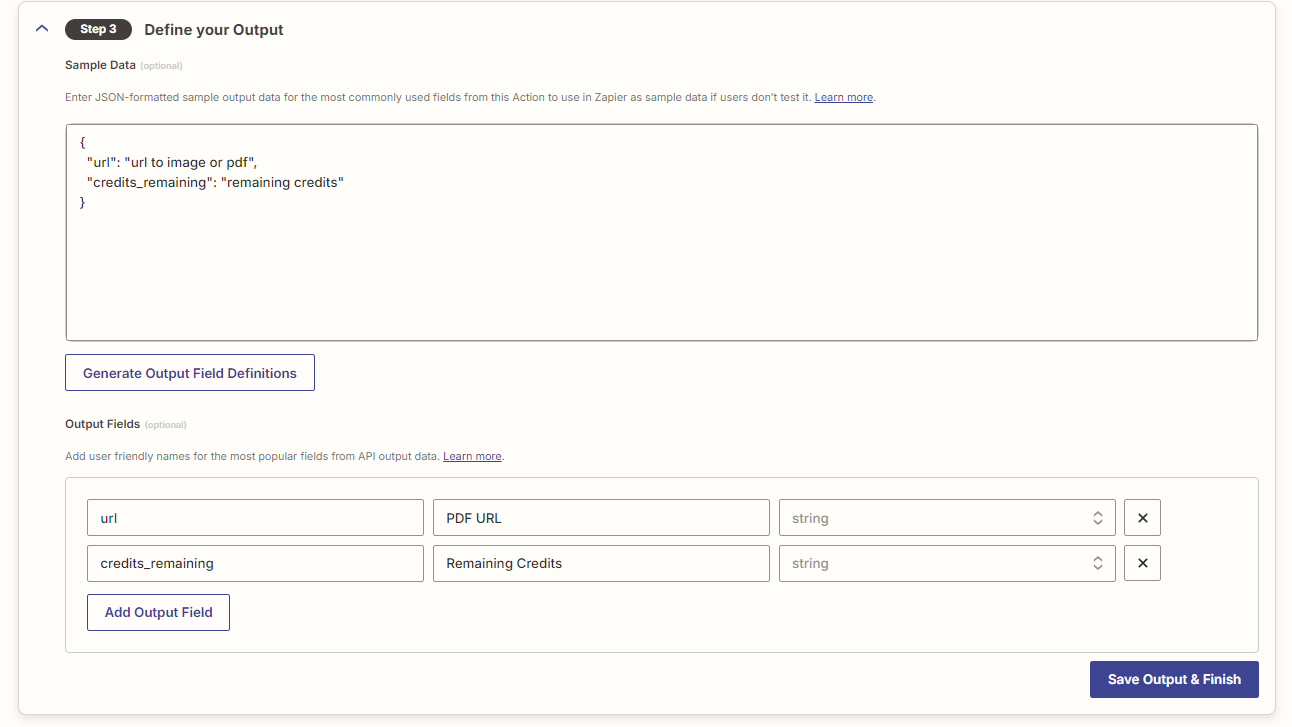
Now go to below step 3 and add the data in the last image for both actions. ClickSave Output & Finish.
Note: You are now almost done.
Add top there might beCreate a Zapbutton. You can click it to create test automation for the image and PDF. If it's sending a proper response. It means everything is setup correctly. If not then look into the steps again.
Blog Configuration
It applies both to new users setting up a blog for the first time and to existing users who want to use blog features via Canvas backend.
-
Install Canvas Package
Install Laravel Canvas via Composer (If you are updating you can also use just composer install):
composer require austintoddj/canvasPublish the assets and primary configuration file using the
canvas:installandstorage:linkArtisan command(This step is necessary for both new and update install):php artisan migrate php artisan canvas:install php artisan storage:link -
Access Canvas Admin
You can access Canvas admin at:
domain.com/canvasBy default the email and password is:
[email protected]
                password
Make sure to change email and password.After logging in, you can create blog posts, manage authors, and configure settings.
-
Cron Job for Schedule Posts
Since this feature runs on Laravel's Scheduler, you'll need to add the following cron entry to your server:
* * * * * cd /path-to-your-project && php artisan schedule:run >> /dev/null 2>&1
Updating
We will not be responsible for any issues
For updating the admin panel extract it locally and run the commands just like for the new install and then make a zip and upload the zip file in your project root folder and extract it. But make sure to make env and other changes if needed.
For updating the nodejs just upload your HtmlScribeFunctions.zip file in your project root folder and extract it. But make sure to make env and other changes if needed.
In some cases you might need to run php artisan migrate
Update after Customisation
If you customized something on the code and want to update to our latest version, follow any option given below:
First, push your code on a git branch. Then download our project code from Codester or any Marketplace and push it to another branch. At last, merge both branches, and it is possible to get conflicts on the branch. Resolve them carefully.
Download the updated version from Codester or any Marketplace and do your customization again.
API Documentation Setup
HTMLScribe uses Laravel Scribe to generate API documentation. Follow the instructions below to make changes to the documentation and regenerate it.
1. Customization Options
If you need to update the introduction or examples section, you can modify the following files:
-
Introduction: Modify the content in
public/assets/img/examples/examples.md. -
Images: Replace or add images in the
public/assets/img/examples/directory.
2. Configuration Settings
Changes to the Scribe configuration, such as formatting or output options, can be made in the scribe.php config file located in your Laravel config/ folder.
3. Regenerate Documentation
After making changes to the configuration or content, follow these steps to regenerate the documentation:
-
Clear Laravel cache:
php artisan config:clear php artisan view:clear php artisan cache:clear -
Generate the Scribe documentation:
php artisan scribe:generate
4. Post-Generation Adjustments (optional)
After generating the documentation,if favicon is not showing. Add the line to resources/views/scribe/index.blade.php in the head section:
<link rel="icon" type="image/png" href="{{ asset('assets/img/favicon/favicon.ico') }}">Localization Setup
To update or add new languages in this project, follow these steps:
1. Updating Existing Languages
Modify language JSON files in the project/lang directory to update the content. The main files are:
project/lang/en.json- Englishproject/lang/es.json- Spanishproject/lang/fr.json- Frenchproject/lang/ar.json- Arabicproject/lang/hi.json- Hindi
2. Adding a New Language
To add a new language:
- Create a new JSON file in
project/langwith the language code as the filename. For example, to add Dutch, createnl.json. - Copy the content from
en.jsoninto the new file and translate each key-value pair.
3. Register the Language
Update the following files to register the new language:
app/Http/Controllers/Language/LanguageController.php- Add the new language code here.app/Http/Middleware/LocaleMiddleware.php- Register the language in middleware.project/resources/views/layouts/sections/navbar/navbar.blade.php- Update the navbar with the new language option.navbar-front.blade.php- Also update the front navbar for consistency.
Troubleshooting
If you encounter any issues while setting up or using the system, please refer to the following common problems and their solutions:
-
Issue: Unable to install Puppeteer dependencies or if screenshot/pdf generation does not work
Solution: Ensure you have the necessary system libraries installed. On Ubuntu, you can run:
sudo apt-get install -y libxfixes3 libxkbcommon0 libnss3 libatk1.0-0 libatk-bridge2.0-0 libcups2 libxcomposite1 libxrandr2 libxdamage1 libgbm1 libasound2 libpango1.0-0 libcairo2 -
Issue: Image and pdf generation are not working
If image and pdf generation are not working you can go your project location in terminal and run
It will provide you with an overview of the issue(s) or missing libraries.node test.js -
Issue: If you are facing any issues regarding the permissions, then you need to run the following command in your project directory
Solution:
sudo chmod -R o+rw bootstrap/cache
sudo chmod -R o+rw storage -
Issue: Laravel application returns a 500 error
Solution: Check your Laravel log files in
storage/logsfor more detailed error information. Ensure your .env file is correctly configured and all required PHP extensions are installed. -
Issue: Node.js application crashes or doesn't start
Solution: Check if all required environment variables are set correctly. Ensure you have the correct Node.js version installed and all dependencies are up to date.